
Antitribu.io
Seeker Guide
Stats
We want high Cooldown Speed, Buff Duration, and Attack Speed. Then we also want decent Range, and as much of our core healing stats as we can get (Healing, Healing over Time, Shield Health.)
Specifically I recommend building these values:
120% Cooldown Speed. You can get away with around 110% or 115%, but 120% is ideal despite diminishing returns. This will let you more rapidly Healing Touch or Swift Healing in emergencies, or alternate between the two, as well as just giving you better uptime on abilities.
Minimum 115% Buff Duration. This will let you keep up major abilities like Flash Wave or Invincible Wall with 100% uptime or near to it. (My Invincible Wall disappears for about half a second between casts without Deadly Markers.) It is possible to build higher - around 130% comfortably with Heroic Chest, but you will sacrifice in Attack Speed and I don’t view this to be favorable.
Wand Attack Speed as low as you can get it. This lets you get out critical abilities faster, specifically Invincible Wall. Don’t underestimate the importance of speeding up this animation, I have saved wipes many times that I would have missed if my Wall was slower. My current in game speed is 0.25 and my goal build for Nix is around 0.28.
For most cases, I recommend picking up all sources of Shield Health instead of Healing over Time where possible, including taking Frigid Melody 4set. Shields in Throne are very strong, and a fully built shield Seeker can easily prevent common one-shots. This setup is very strongly boosted by Cordy Wand, but I recommend building for it even if you don’t yet have your’s. You should aim to achieve Cordy Wand eventually. The Shield pieces we want are Cordy’s Grasp (ideally NOT cored - we want Heroic Bow + Cordy Wand for extra 16% Shield Health, Sacred Tree Resurrection Ring, and Silvermoon Knight Belt.
Then in slots that don’t have Shield Health pieces, we can take ones with Healing or Healing over Time. In Nix, I’m planning to build Consumed Greed Flame Bracers for Healing over Time, and Blinding Sun Torc and Breaking Dawn Earrings for Healing.
If you really don’t want to do this, the alternative is to build Azure Sky Apostle and all sources of Healing over Time. I also have a middle-point build that combines Azure Sky Apostle 4-set and Healing over Time with Cordy Wand to try and reach a best of both worlds. That said, we get enough free Healing over Time and Healing from the gear we take in the Shield build and from our weapon passives that I am choosing to build the Frigid Melody setup.
Heroic Bow is probably BiS for Nix. This is mostly because Aelon will no longer scale to current endgame item levels, being stuck at level 50. With Nix, there are no cores that actually compete at all with Aelon’s pure healing effect. Seed of the World Tree is probably better than nothing, but replaces your Nature’s Touch with a more cumbersome ability for what is ultimately just a bit of Health Regen stat, not proper healing.
For Runes, you want either Healing over Time or Shield Health wherever they can be inserted, INCLUDING Chaos Runes.
Skills
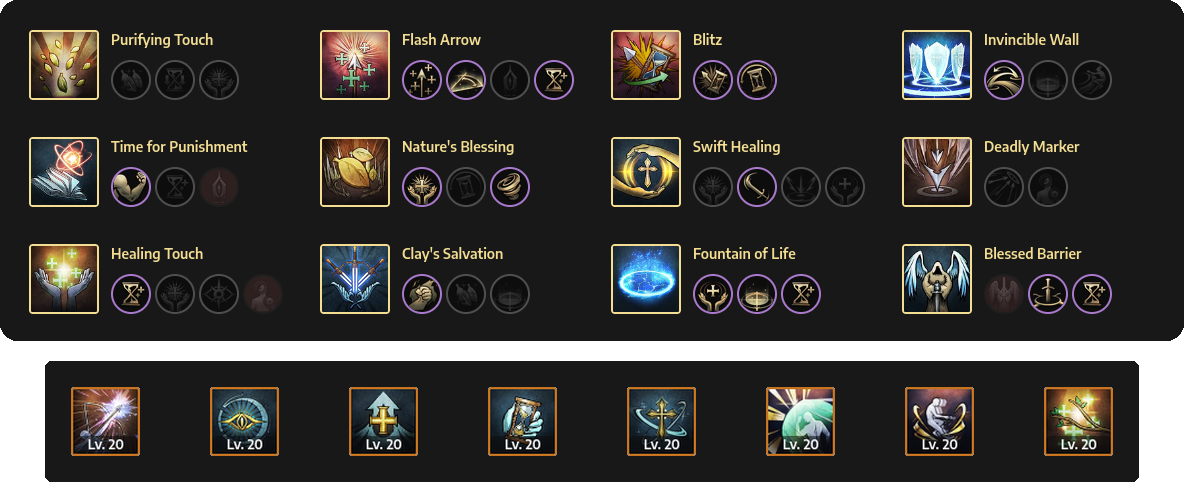
The one change we’ll be making in Nix is to slot Corrupted Magic Circle once we get our Sacred Magic Circle core. I’m planning to drop Purifying Touch for this since we almost never need to single target cleanse in PVE and every other skill brings significant utility.
I take Swift Healing along with the consecutive use spec for situations where allies are significantly injured and likely to take more damage. If players are safe, we use Healing Touch instead and combine this with Nature’s Blessing on them to quickly heal them up and prevent damage spikes. Nature’s Blessing should be used on CD for mana and to combine with Healing Touch for Vigorous. I take Duration Increased on Healing Touch for lack of anywhere else to put points, it can sometimes help a little bit. Critically, you always want to have Vigorous specialization on Nature’s Blessing, as this significantly increases our Healing over Time output.
Deadly Marker should be cast on cooldown, it is one of the strongest abilities in the game for group damage. On bosses, you should blitz this, wait a few seconds, then send the second. We do not wait for the first marker to expire before casting another. This is because Deadly Marker has a cap of critical hits that will contribute to cooldown reduction before you stop benefitting. In current endgame gear this cap will be reached very quickly. I take Limit Break on my Blitz, along with cooldown reduction for more Deadly Markers overall. Most often you will use the Limit Break on Flash Wave, but if someone is low then a Limit Break’ed Healing Touch can be better than casting Swift Healing.
Janice’s Rage should always be taken over Clay’s Salvation. This is one of our biggest group buffs. The only time I take off Janice’s Rage is to point swap to Weaken Removal for Dimensional Trials weeks with Seed of Ruin. I just do this to save my brain the urge to cast Janice.
I take all 3 Fountain of Life specs, but the critical one is Mana Recovery for your DPS. They won’t always benefit from this, but it is good for upkeep on mana hungry classes like Orb alongside Nature’s Blessing.
We take Expanded Targets on Blessed Barrier. We don’t really need the extra tankiness in the first 2 seconds that the single target version provides. I also take Duration Increased so I can maintain as high uptime as possible. In endgame builds the buff should be 100% uptime on everyone as long as they are near you.
If you have your Sacred Magic Circle core, you’ll want to take Rotten Marsh for higher uptime. Yes, this synergy works for some reason. They might patch it, but for now it seems to be intended.
In content with a lot of debuffs, you still won’t need to cleanse, but you CAN add spec points to Purifying Touch to apply free Healing Touches to targets. I would always take these points off for boss fights though, they will be wasted.
Invincible Wall wants the Expanded Targets spec at all times, there is no downside.
Enchanting Time beats out Time For Punishment in most cases. Firstly, on Shield builds it will provide a decent cushion of shield to non-wand DPS (it won’t stack with Wand DPS”s own buff). Second, Time for Punishment will most likely be uptimed just by basic attacks and the Corrupting Hit mastery, especially with wand DPS in party.
For passives I take Selfless Soul, Eye of Devotion, Noble Revival, Wraith’s Beacon and on bow, Begin the Hunt, Devoted Shield, Earth’s Blessing, and Distorted Sanctuary. Devoted Shield can be replaced with either Rapidfire Stance or Selfless Soul, but I prefer the safety net of my bubble. If you’re confused by why Wraith’s Beacon is taken on healer, it’s the wand Mastery node “Celestial Boost”.
Mastery

I haven’t changed anything from T3. Avoid Combat Sanctuary at all costs, as this will remove Healing over Time stat from your bow passive. In the past I advised against taking Survival Mend, but this is actually okay to take. It will add a small self heal to your Healing over Time passive without removing the stat. I also take Life Ward for my oh shit bubble, Blessing of Wisdom for free Cooldown Speed, and Archer’s Surge for increasing group damage. You shouldn’t actually need to stack Healing Touch to benefit from this. In content with Deadly Marker your Nature’s Blessing will do the work. Everything else is fairly low impact.
On Wand, we take both Eye of Devotion nodes, as well as Celestial Boost for our shields and Fountain of Life, and Corrupting Hit to upkeep Time for Punishment and some curse damage on boss. Take both left side epic nodes to increase healing output. Malicious Focus is taken incidentally, we don’t use Full of Corruption.
Playstyle
Upkeep Flash Wave, Blessed Barrier, Janice’s Rage, Nature’s Blessing, and Fountain of Life, Invincible Wall and Enchanting Time at all times. We don’t need to think about this at all most of the time. The only exception really comes in with Halls oF Tragedy T10, where we want to save our Blessed Barrier and Invincible Wall with Blitz for the stone phase. Cast Healing Touch on CD when you have nothing else to do. Cast Deadly Marker on cooldown at high priority, preferably with Blitz - although I use Blitz on Invincible Wall instead in trash pulls. Swift Heal when your allies are too low to quickly heal up with Healing Touch.
FAQ
Bow or Wand out? - Doesn’t matter. Wand technically attacks faster and can technically upkeep Time For Punishment slightly better because of this, but the difference is minimal.
Guardian? - Lonely Soul for group shield or Fairy for party attack speed buff.
Does Stellarite matter? - Yes.
Artifacts? - Any are fine. We don’t benefit from Crit Damage so don’t use your damage ones. I run either Ancestral Armor for HP or Forsaken Zealot for Stamina and Defense.
Bow or Wand block? - I use bow for the dash after dodging. It helps with positioning , but mostly it just gives me dopamine. Wand block is fine too if you prefer it.
Heroic Wand okay? - Yes, but you either lose Aelon passive or eat the loss of iLvl with having it not scale.